Aging Weapons Systems Repair using Friction Stir Welding
Abstract
Friction stir welding and processing (FSW&P) was identified in the FY07 Aging Aircraft Study conducted by the South Dakota School of Mines and Technology as a technology that is ready to enter into a qualification process for use as standard repair technique on aging weapons systems. FSW has been widely investigated as a manufacturing process with successes reported in the commercial and government sectors; however, little is reported in the literature on the qualification of FSW&P for repair applications. Preliminary analysis in this study utilizing FSP for repair of several components showed technical feasibility. In addition, the demonstration of FSP to refurbish an actual part was successful. Radiographic inspection showed that the volumetric defects and fatigue cracking were processed from the candidate component. The study produced a cost benefits analysis which estimated $9.4M annual savings to the USAF alone for components repairable with FSW&P.
Introduction
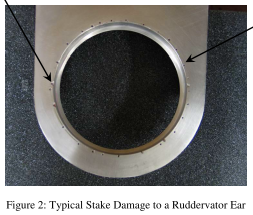
The purpose of this FY07 Aging Aircraft Study [1] was to investigate the use of advanced processing technologies such as friction stir welding and processing, laser deposition and cold spray in repair/remanufacturing applications of aging weapons systems. In particular, friction stir welding and processing presented some unique opportunities to repair worn or cracked components. One of the chosen parts for this remanufacturing study is the ruddervator fitting for the KC-135 re-fueling boom (Figure 1). This structural component is responsible for connecting the re-fueling boom to the rudder shaft. The component has two ears, each with a bearing race. When the bearings are installed, it is common to use a punch and hammer to deform the part and stake the bearing in place. Unfortunately, these stake marks are stress concentration points and form fatigue cracking when placed into service. A picture of the typical stake marks in the ruddervator fitting is shown in Figure 2.

The ruddervator project was completed in three phases. Phase I, a defect processing study, focused on testing the ability of friction stir processing (FSP) to repair volumetric defects (holes) from the aluminum test part. Phase II, welding of surrogate test parts, proved friction stir welding (FSW) can be used to install a plug into a bore to eliminate defects and add material, then be re-machined to part tolerances. Phase III was the application of knowledge learned from Phases I and II in the demonstration of FSP to refurbish the ruddervator fitting.
Experimental Procedure
Phase I: Defect Processing Study
The defect processing study “stake-marks” were simulated with holes drilled into a piece of 0.125” 7075-T6 sheet stock. These 0.065” diameter holes are similar in diameter to the defects found on the defective parts and were made to be 50%, 100%, and 150% of the observed defect depth (0.030”, 0.060”, and 0.090” respectively). Hole spacing and depth were controlled using a vertical mill with digital readout.
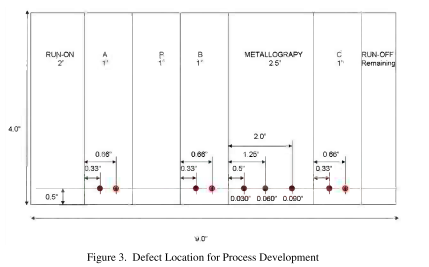
All defect locations remained constant in the coupon specimens. Two evenly spaced defects were made in a 1.0” lap-shear specimen. Defect size for lap-shear specimen locations was ordered using design of experiments (DOE) to identify any trend in specimen location. A metallographic specimen was taken for all processing parameters with the 0.030”, 0.060”, and 0.090” defects 0.5”, 1.25” and 2.25” into the specimen, respectively (Figure 3).
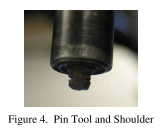
The base sheet was aligned in a jig and clamped in place with a 0.040” 7075-T6 sheet on top in a lap-weld configuration. The fixture allowed all parts to be welded with the same weld program and set-up. Two sets of welding parameters were down selected from previous weld schedule development: 600 RPM and 11 IPM yielding a Pseudo Heat Index (PHI) of 2.27, Parts 4, 5, and 6 used 800 RPM and 9 IPM yeilding a PHI of 7.57. Weld runs were randomized and both sets of parameters used a 2º lead angle and heel plunge of -0.005”. All welds were made with adjustable pin tool with scrolled shoulder and tapered, tri-flute, threaded pin profile as shown in Figure 4. Welds were centered over the defects 0.5” from the edge of the part and were 8.2 inches in length.
Welds were allowed to naturally age for a minimum of 24 hours, then all lap-shear specimens were cut to approximately 1” wide, randomly loaded into the MTS 858 mini tensile machine with shims and pulled at 0.060” per minute. This load rate allowed for all specimens to be broken in approximately one minute. All specimens broke at the sheet-thinning defect in the lap weld.
Metallographic specimens for parts 1 and 4 were sectioned at the defect location and parts 2 and 5 were sectioned 0.125” up-weld of the defect locations which is approximately equivalent to 1 pin diameter. Metallography was conducted to inspect for remaining defects. Selected metallographic specimens were radiographically inspected at Ellsworth Air Force Base (AFB) in Rapid City, SD. Defects were found to be fully processed from the specimen coupons.
Phase II: Welding of Surrogate Parts
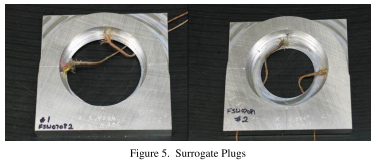
The pathfinder experiment utilized two surrogate parts, similar in geometry to the Ruddervator fittings, and two plugs machined from 7075-T753 barstock (Figure 5). Four defects, 0.065” in diameter and 0.090” deep were installed in the four quadrants of each bore. Defects were installed approximately 0.060” on center, radially from the edge of the bore.
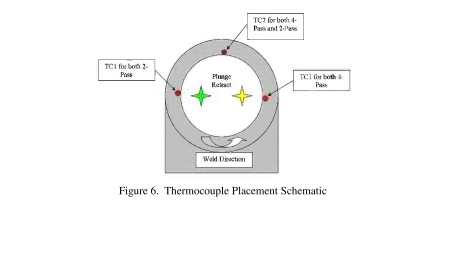
Weld path plans were developed in MasterCAM and modified with South Dakota School of Mines and Technology (SDSM&T) Advanced Materials Processing Center's (AMP) 3D path planning software. FSW tooling and parameters were identical phase I development. Pin penetration into bore surrogate was approximately 0.120”. Thermocouples were mounted in the surrogate parts at three locations to capture comparative information between a 2 and 4 pass weld and to compare the thermal conditions between the surrogate part and the prototype (Figure 6). Thermocouples were placed in the quadrants of the surrogate parts where the bore meets the bearing stop. Plugs were pressed into the bores using a manual hydraulic press (Figure 7).

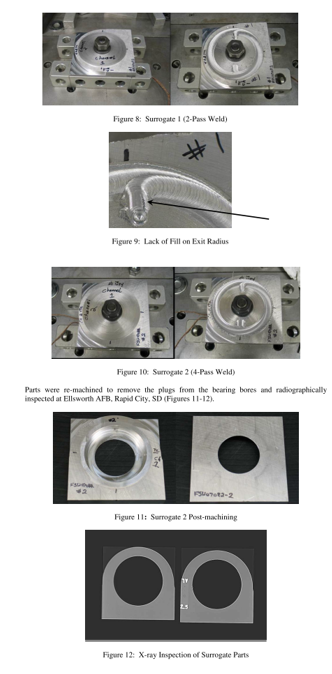
Parts were fixtured on the FSW table and were elevated on 1.5” tubing from a tooling system from Marino Gauge. The only clamping holding the parts in position was a single 5/8” bolt through the center of the plug (Figure 7). To test the weld program, a 4-pass test-weld was made on a piece of 0.25”, 6061-T6 aluminum fixtured in a similar manner to the surrogate parts. A two-pass weld (Figure 8) was completed on the first surrogate part with success. On the exit radius however, a lack of consolidation (LOC) defect formed through the radius (Figure 9). A four-pass weld (Figure 10) was completed on the second surrogate part with success. The travel speed was reduced through the exit radius, which reduced the LOC defect, but did not totally eliminate it.
Phase III: Prototype Production Study
Paint was removed from the working surfaces of the ruddervator fittings using a pneumatic abrasive wheel to expose the bare aluminum. The bearing race was then submerged in a NaOH solution (10% by mass) prior to conducting a dye-penetrant inspection. The ruddervator fittings were measured with the Faro Coordinate Measuring Machine to determine the parallelism of the two part faces to be welded. Measurements indicated that Parts 1 and 4 were parallel to within 0.005” and 0.0025” respectively. It was determined that these features were adequate to use as datums.
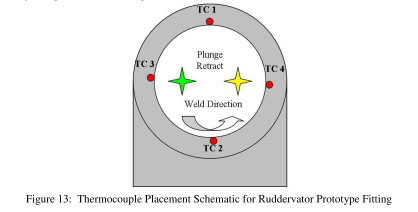
Four plugs, two large and two small, were machined from 7075-T753 bar stock. Thermocouples were mounted to the part in quadrants (Figure 13) at the base of the bearing stop and were placed with high temperature thermocouple cement.
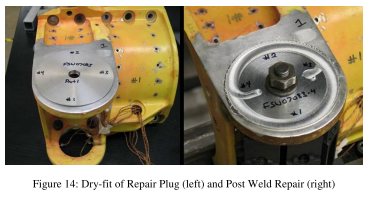
The prototype ruddervator fitting was cleaned with a solvent wipe and the machined plugs were pressed into place (Figure 14). Standard tooling was used and was similar to the setup used in welding the surrogate parts in the previous section. This was important to avoid differences in the thermal and mechanical conditions used in the development of the repair process to aide portability between surrogate and prototype production. Welds were made using the parameters developed in the previous section (800 rpm, 8 ipm) while thermal data was being collected via a data acquisition system. Welds were made counter-clockwise about the center of the plug, with two inner passes followed by two outer passes. Following welding, the resultant plugs were machined from the ruddervator fittings and the repaired part was radiographically inspected which revealed that no volumetric defects remained in the part.
Results and Discussion
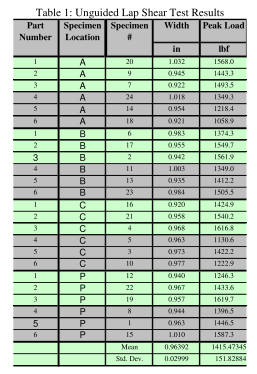
During the defect processing study, the traverse (x) forces showed a force spike whenever the pin tool encountered a defect. The largest force spike corresponded to the defect of the largest size (deepest hole) although the difference was relatively small at 100-200 lbf. Metallographic inspection was unable to find remaining volumetric defects, further suggesting the defect was repaired. Radiographic inspection supports the conclusion that defects were processed from the parts. Lap-shear testing results suggest that weld strength varies slightly with specimen location and “hotter” or higher PHI welds may do a better job of processing larger defects (Table 1). The specimen location identification (A, B, C) is related to the location on the welded plate as shown in the previous section. Defect size and position were placed randomly using a design of experiments approach. It appears, though the evidence is not conclusive, welds later in the coupon are usually stronger than those welds earlier in the coupon. This may argue for a longer run-on than currently is being used. In any case, position A seems to yield the lowest strength across defect size.
In the welding of the surrogate parts, the test weld used for path planning in the 6061 aluminum alloy was marginally thin to support the process loads induced by the FSP. Because of the thickness of this test piece and the inconsistent backing support, there was some material “blistering” on the back side. The actual surrogate parts additional thickness was adequate and this indication was not present. The exit radius LOC seen in the first surrogate part was lessened in the second article by utilizing a reduction in the programmed travel speed in the transition zone to the termination of the weld. The article with four passes was only slightly hotter than the
article with two passes. It is possible that steady state temperature was reached and that peak temperatures will not exceed 600oF with more than four passes.
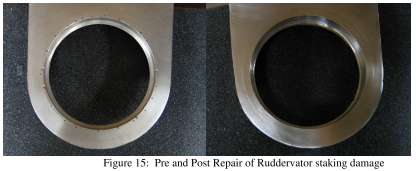
Utilizing the information and procedures developed in the defect processing study and the surrogate parts welding, the prototype production parts were processed with some confidence in the quality of the repair. A LOC indication was still present even with the increased radii employed for the exit procedure. The stake defects were observed to be successfully processed from the part once the plug was machined from the bore (Figure 15). The plug machined out of the ruddervator part, however, slight concentricity issues exist between the re-machined bore and the pre-welded bore. The radiographic inspection of the part showed no remaining volumetric
defects. The maximum temperature for both the surrogate and prototype part as measured by the thermocouples was approximately 550oF.
For the FSW/P repairs investigated in this study a cost benefits analysis estimated a $9.4M annual savings to the Air Force (AF) alone accounting for approximately 25% of the AF inventory. The cost estimates were projected by identifying likely candidates for repair from items that are currently non-repairable. Potential repair applications were analyzed and in some cases, demonstrated. The cost of purchasing new items verses repairing items was then analyzed to determine the projected cost savings on an annual basis for that component. The estimated savings was then extrapolated to other airframes with similar components. For example, the B-1, F-16 and F-15 have similar engines so a component that can be repaired on a B-1 engine was extrapolated to account for the additional number of F-16 an F-15 engines. The combined analysis accounted for the Air Force inventory and did not account for Navy, Marine or Army hardware.
Conclusions
Overall, the repair demonstration on the ruddervator fittings was a success. Radiographic inspection showed that the defects were fully processed from the parts. The parameter development welds showed a defect size of 150% could be processed with a single pass. While the defects have been removed, the heat input to the part alters the material temper of the aluminum part (W condition in the weld nugget and overage in the HAZ); this could be a problem since the ruddervator fitting is a structural component and may require a harder/stronger material to hold the bearing in place. However, the fatigue defects causing the scrapping of theparts may not be as critical in the heat-affected-zone of the FSW for the general reason that softer materials are less susceptible to fatigue failure. More development work is warranted to resolve this issue. Volumetric defects and fatigue cracking have been successfully processed out of the ruddervator fittings with little difficulty using friction stir technology. This demonstration suggests the repair of structural aircraft components is feasible via friction stir processing.
Investigation of forge (z-force) controlled welding is recommended; it may be beneficial to use forge force control over the position control method currently being used. Forge force control would reduce the force spikes occurring at the defects and could potentially increase the defect size capable of being processed.
References
1. Arbegast, W., Pillay, G., “Aging Aircraft Repair Feasibility Study,” Alion Science and Technology Contract number #1919KR through the United States Air Force, 2007.
Acknowledgements
This study was supported by the Air Force and accomplished under a contract through Alion Science and Technology contract number FY2007 - #1919KR. Thanks to the students at the Advanced Materials Processing Center at SDSM&T who participated in this study.
