Effect of Fit-Up Tolerances on the Strength of Friction Stir Welds
Part fit-up variations are critical to the joint quality produced by joining operations like friction stir welding (FSW). Typical fit-up issues may include: gaps, misalignment between the weld path and joint line, setup related variations, voids or holes in the weld path, mismatch between materials being joined, etc. These and other factors potentially result in variations in mechanical properties between the start and finish of the weld as well as lead to the possible formation of defects along the joint line. The purpose of this study was to determine the robustness of the FSW process to selected imperfections in joint fit-up between plates in butt-welding. Specifically, it includes a study of the effect of part fit-up variations on the transverse joint tensile strength of 0.125” thick friction stir butt-welded 7075-T73 aluminum plate. Welds were performed on an MTS® ISTIR™ PDS friction stir weld machine at the National Institute for Aviation Research in Wichita, KS. It was found that the FSW process was capable of creating a sound defect-free joint for a range of typical fit-up discontinuities. The tolerance zone for weld path misalignment to the joint line was related to the formation of fine nugget grain structure at the bottom of the weld, with two-thirds of the tolerance zone located on the advancing side of the pin. It was also determined that a certain amount of plate gap or voids in the weld path can be tolerated without a decrease in tensile strength; beyond that point, volumetric defects form in the nugget. Otherwise, there is little variation in tensile properties along the weld joint when care is taken to ensure gap and alignment tolerances are not exceeded.
Nomenclature
σ = engineering stress HAZ = Heat-Affected Zone
TMAZ = Thermo-mechanically Affected Zone FSW = Friction Stir Welding
I. Introduction
Friction Stir Welding (FSW) is a relatively new technology which has been rapidly moving from the research lab to the shop floor over the past 10 years or so. Patented in 1991 by The Welding Institute in England, FSW is a
solid state joining process capable of joining aluminum alloys including 2XXX and 7XXX series alloys. Although referred to as friction stir “welding,” the materials are not actually fusion welded as in traditional welding processes. Rather than melting the material, FSW relies on large forging forces and frictional heat to locally extrude material around a rotating pin, and then forges the material into a consolidated joint. Joints formed in this way have been found to possess strengths in the range of 80-90% of the parent metal strength, are stronger than a traditional fastened joint, and possess comparable fatigue and damage tolerance properties to the parent material.1,2
For production, there is a need to specify allowable misalignments and fit-up errors, as well as to characterize property variations over the length of the weld. Part fit-up variations are critical to the joint quality produced by
___________________________________________________________________________________________
* Research Scientist, Advanced Joining Lab, 1845 Fairmount, Box 93, Wichita, KS 67208.
† Sr. Research Engineer, Advanced Joining Lab, 1845 Fairmount, Box 93, Wichita, KS 67208.
‡ Sr. Research Scientist, Director, Advanced Joining Lab, 1845 Fairmount, Box 93, Wichita, KS 67208.
____________________________________________________________________________________________
joining operations like friction stir welding. Typical fit-up issues may include: gaps, misalignment between the weld path and joint line, setup related variations, voids or holes in the weld path, mismatch between materials being joined, etc. These and other factors potentially result in variations in mechanical properties between the start and finish of the weld as well as lead to the possible formation of defects along the joint line. The purpose of this study was to determine the robustness of the FSW process to imperfections in joint fit-up between plates in butt-welding. Specifically, it includes a study of the effect of part fit-up variations on the transverse joint tensile strength of 0.125 in. thick friction stir butt-welded 7075-T73 aluminum plate.
II. Literature Review
When designing experiments, it is important to have a thorough understanding of all significant variables and potential sources of error for developing confidence in the resulting data. Therefore, it is worthwhile for the researcher to identify which parameters may have a strong influence on results and which parameters may be ignored. In the case of friction stir welding, a large number of potential variables can be evaluated. An understanding of those variables is necessary so that only the most important factors are included. To that aim, a literature review of existing findings regarding variability in FSW was performed.
A. Essential Process Variables
In a study by Record et al. (Ref. 3) to determine the “essential process variables,” less than half of the nine factors investigated were found to have any significance at all. Their findings confirmed that spindle speed, feed rate, and plunge depth are the essential variables in FSW, and that other factors such as weld location, pin length, weld cooling, starting distance from plate edge, pre-weld cooling, and dwell time may not be significant factors under some conditions. However, it should be noted that their findings were from a fractional factorial, which only estimated the main effects, and that their findings were over specific intervals.
B. Weld Temperature Classification
Another variable in FSW is heat input. For a given tool, material, and thickness combination, there may be a large or small processing window that allows for the creation of a defect free joint (i.e. there may be multiple spindle speed / feedrate combinations that produce an acceptable joint). If the window is large, then there is the opportunity to distinguish between relatively “hot” and “cold” welds, where higher rotation speeds and lower feedrates are associated with “hotter” welds, and visa versa. A study by Lockwood (Ref. 4), however, found that in certain instances there may be little difference in properties between “hot” and “cold” welds. A similar finding was made by Klæstrup Kristensen et al. (Ref. 5), where they looked at the influence of welding parameters on tensile strength. Hashimoto et al. (Ref. 6) also reported data that, in their study, when the fracture location was in the HAZ or parent material, indicating a defect-free weld, there was no significant welding parameter influence. This is an important finding because it suggests that in some instances, for a given material/tool/material thickness combination, a single “optimized” parameter set is sufficient to characterize its performance.7 It should be noted, however, that certain high-strength, precipitation-hardened alloys may show more significant sensitivity to extreme “hot” and “cold” processing parameters, especially in thicker material where heat inputs are greater. In those alloys, thermal management of the weld is more critical and a larger difference in performance between “hot” and “cold” welds can be observed.8
C. Joint Fit-up Variations
A study by Burford (Ref. 9), examined the effects of plate gap, joint offset, and tensile property variations in good welds. He found that a certain amount of offset and plate gap was permissible in a friction stir weld with no deleterious effects on strength and, further, that the standard deviation of the tensile strength of the welds was exceptionally low over the entire length of the weld. Magnusson and Källman (Ref. 10) also reported no significant variation in tensile data from the start to the end of a defect free FSW. Similarly, Christner and Sylva (Ref. 11) studied plate gap, differential thicknesses, and variations in plunge depth. Some work has also been done to quantify weld variations non-destructively in real-time using process forces. Arbegast (Ref. 12) found that some common friction stir welding defects could be predicted by monitoring and analyzing the process force feedback during or just after a friction stir weld has been completed. Related work was done by Leonard and Lockyer (Ref. 13) to characterize a number of common friction stir welding defects and identify their most common sources. They were able to develop a troubleshooting guide for two of the most common FSW defects: voids and root flaws. Voids are pores or unconsolidated areas in the weld nugget, while root flaws are unjoined remnants of where the plates were originally butted together.
D. Weld Flaws and Defects
Other researches have endeavored to make a distinction between “defects” or “imperfections” and “flaws,” i.e. that some defects have no measurable impact on material properties and therefore cannot properly be called flaws. Dickerson and Przydtek (Ref. 14) found that only root flaws above a certain size had an impact on strength or fatigue crack propagation (FCP). In fact, flaws must be very large or located in the heat-affected zone to show a marked reduction in tensile strength. Russell et al. (Ref. 15) investigated the effect of holes in and around FSW joints in 2024-T3 and 7075-T6. When tested in the transverse direction across the weld, only a minor reduction in strength was observed when a 0.25-inch hole was made in the center of the weld nugget in a 0.500 in. wide tensile coupon. However, a 40 percent decrease was observed when the same hole was placed in the heat-affected zone of the weld. Similarly, Dalle Donne et al. (Ref. 16) found that weld pores did not have a significant effect on FCP rates in the nugget. However, both studies did find an impact on fatigue.
Booth and Sinclair (Ref. 17) found that fatigue failures in the nugget region appear to compromise fatigue life, and that coupons that failed outside of the nugget area were comparable with published parent material data. The failures that occurred in the nugget were “related to the presence of macroscopic discontinuities in the flow pattern of the flow arm,” which they showed to have differences in hardness values between the bands. The presence of voids or other discontinuities would only exacerbate that effect.
A related investigation by Lederich et al. (Ref. 18) studied the effect of root flaws on tensile strength and fatigue, and the effect of post-weld machining and blending on the fatigue life of as-welded FSW coupons. They determined that for 0.080 in. thick friction stir welded 2024-T3 surface smoothing of the friction stir weld zone with a light abrasive such as a Scothbrite™ pad (with an approximate 2 percent reduction in thickness) could have an improvement on fatigue life, while surface milling plus blending (~8 percent reduction) had a negative effect. Bussu and Irving (Ref. 19) also concluded that the fatigue life of FSW specimens could be enhanced by surface skimming and correlated crack initiation sites to weld geometry. Liu et al. (Ref. 20) related flaw type to fracture location. Palm et al. (Ref. 21) found that in FSW butt-welds the abutting surfaces of the plates could contribute line-type oxide particle inclusions, depending on the material and method of preparing the surface prior to milling. This was confirmed in a scanning electron microscopy (SEM) and transmission electron microscopy (TEM) study performed by Vugrin et al. (Ref. 22). They were able to show that some type of suitable surface treatment immediately prior to friction stir welding is essential to avoid the entrainment of unnecessary amounts of surface oxide (scale) and surface hydroxides into the weld nugget. Some levels of oxide inclusion are certain to be present in friction stir welds, however, and without detrimentally affecting weld properties. For example, Larsson et al. (Ref. 23) reported the detection of oxide inclusions more readily in dissimilar joints, even when they did not have a significant effect on joint strength. Finally, Bird (Ref. 24) and others have demonstrated the ability to detect common friction stir welding defects using non-destructive methods, such as ultrasonic phased array inspection.25
III. Procedure
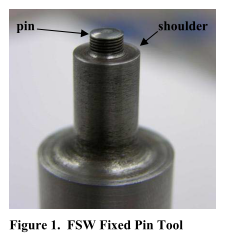
To study the effect of various fit-up related tolerances in FSW, three sets of 0.125 in. 7075-T73 flat plates were butt-welded on an MTS I-STIR PDS friction stir welding machine at the National Institute for Aviation Research in Wichita, Kansas using a basic fixed shoulder pin tool, shown in Figure 1. The base material properties and composition of the plates used are given in Table 1. All of welds were made at 600 rpm and 8 ipm, under load control with a forging force of 1750 lbs, except where noted. The first plate was welded to simulate the optimum or perfect condition. It was carefully aligned and fixtured prior to welding. On the second plate, a weld program path to actual weld path misalignment was simulated. The weld was programmed to run from 0.100 in. offset on the retreating side of the tool (placing the joint on the advancing side of the weld) to 0.100 in. offset on the advancing side of the tool (placing the joint on the retreating side of the weld), with a total weld length of 27 inches. On the third plate, the start of the weld was begun with no space between the plates, but the end of the weld was given a gap of 0.035 in. This weld was produced using position control
with a 0.005-inch heel plunge over a distance of 25 inches. The final weld was made in a plate containing a series of holes in the weld path at 1 in. intervals to test the ability of the process to close up voids in the weld path, and was a 22 in. weld under load control. Prior to testing, all of the plates, except the hole study (1 week natural aging), were artificially aged at 225°F for 48 hours in order to stabilize the weld nugget.26,27 The welds were then evaluated by tensile testing and optical microscopy to characterize volumetric defects. Tensile testing was performed on an MTS 5 kip 810 Material Test System, where only ultimate loads were recorded.

IV. Results and Discussion
A. Variations in a Normal Welded Plate Including Start and End Points
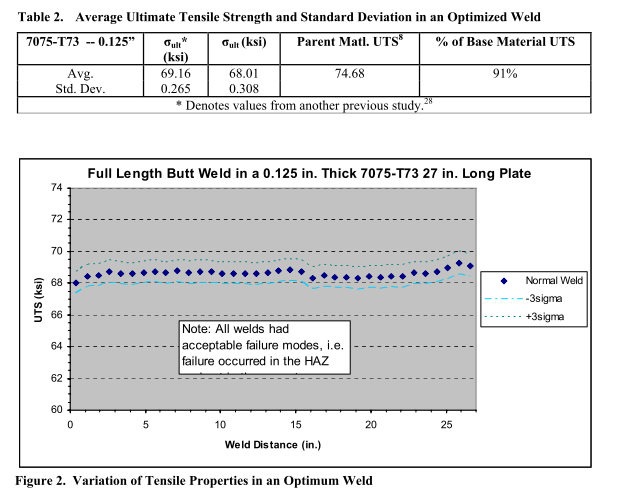
For the first part of this study, the baseline variation of tensile properties in an optimum welded plate was established over the entire length of the weld. Coupons were taken as close to start and end points as practical, and the results are depicted in Figure 2. The average and standard deviation of all the samples are given in Table 2, which shows a comparison to another similar study, where coupons were not taken from the start or end of the weld. Approximately 91.7% of failures occurred on the retreating side of the weld in the heat-affected zone (HAZ), with only 8.3% of failures occurring on the advancing side of the weld, with no apparent correlation to ultimate tensile strength (UTS). This result is also consistent with another study where the variation in UTS was determined to be extremely low with an 89% and 11% distribution of failures on the retreating and advancing sides respectively.8
B. Weld Path Misalignment
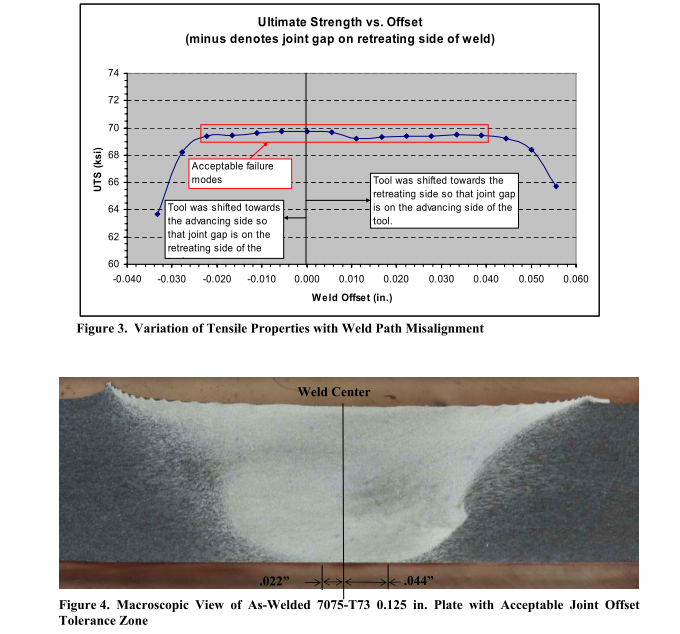
In the second part of this study, the amount of weld path to joint misalignment tolerable was determined by intentionally welding a diagonal path across the joint seam. Tensile specimens which failed in the HAZ on either the advancing or retreating side of the weld were deemed to have acceptable failure modes. Failures which occurred in the nugget were determined to be unacceptable as they exhibited lower strength with little plastic deformation prior to failure, as a result of a lack of full joint consolidation. The average tensile strength for acceptable failures was 69.46 ±0.18 ksi. The results are shown in Figure 3. In Figure 4, the findings were projected onto a micrograph of an optimum weld to visualize the tolerance zone on each side of the weld. The tolerance zone was 0.044 in. on the advancing side and 0.022 in. on the retreating side, which was approximately one third the width of the pin, with two thirds of the tolerance zone located on the advancing side of the pin. This finding is in agreement with a similar study, which also found that the advancing side of the tool could tolerate more misalignment than the retreating side.11
C. Allowable Plate Gap
The third experiment in this study was to determine the amount of acceptable joint gap that
could be tolerated in a butt weld of 0.125 in. Surface Lack of Fill 7075-T73, using again the tool depicted in
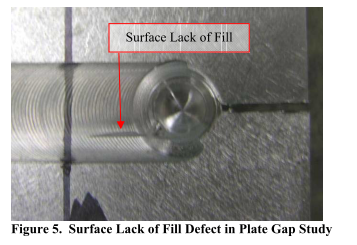
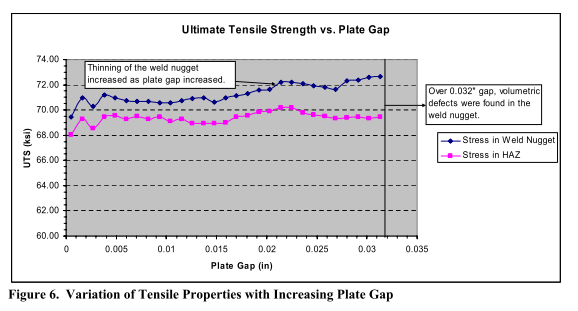
Figure 1. Gaps were created by placing spacers in between the plates at the ends of the weld region. It was found that as the plate gap increased, weld quality remained relatively constant up to a certain point at which a surface lack-of-fill was observed as shown in Figure 5. The formation of volumetric defects in the weld nugget preceded the formation of the surface defect. Those samples in which volumetric defects were detected by polishing the sides of the samples prior to specimen preparation were not tested, only samples without optical defects were examined in this study. The average tensile strength for tested samples was 68.75 ±0.43 ksi. The results are shown in Figure 6, and showed that, in this configuration, the process was capable of closing a gap of up to 0.032 in. Two curves are plotted in Figure 6. The difference in the curves is due to thinning in the nugget due to the presence of a gap. Although the weld nugget thinned from closing the plate gap, and thus was carrying increasingly more load, the failure remained in the HAZ (where the plate thickness was constant) because of its lower material strength caused by overaging.
D. Holes in Weld Path
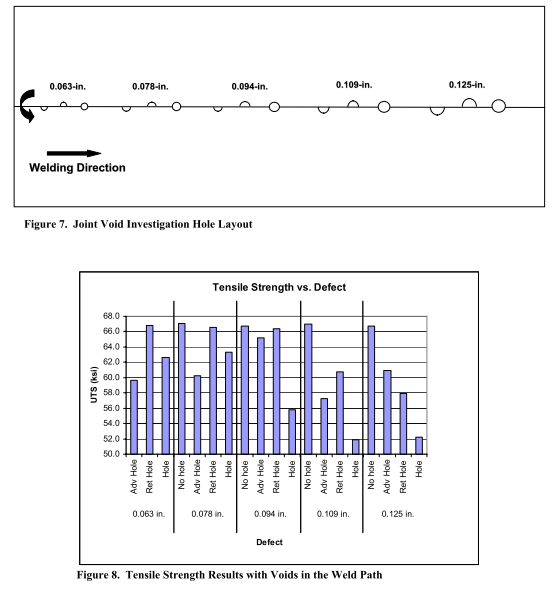
The final stage of this investigation looked at holes or voids in the weld path. A pattern of holes of increasing diameter was machined into a plate as shown in Figure 7. The influence of voids on the advancing versus the retreating side was investigated in addition to full voids, as shown. The tensile results of coupons machined from the plate after welding, and centered on the location of the void are shown in Figure 8. Under load control, the tool was able to visibly close the joint without creating a surface defect in all cases; however, the presence of weld discontinuities caused failure to occur in the nugget of all of the samples which failed below 66 ksi. Of the samples which failed in the HAZ, the average tensile strength was 66.7 ksi, with a standard deviation of 0.22 ksi. The overall reduction in tensile strength is most likely due to testing of these samples in the naturally aged condition, i.e. without post-weld aging, which was shown previously by the authors to account for an approximate 2 ksi strength increase over natural aging.29 It is also important to note that even in cases where large voids showed a substantial decrease in tensile strength, samples tested from hole-free regions immediately following the larger holes showed no adverse effects, indicating that the detrimental effects from localized discontinuities remained localized in this case.
V. Conclusions
The purpose of this investigation was to gain insights into the sensitivity of friction stir welding to common weld fit-up variations including 1) weld-path misalignment to the plate joint to be welded, 2) allowable plate gap between sheets to be butt-welded, 3) allowable void or hole size in the weld path, and 4) the variation of tensile properties from start to finish in a normal weld. In each portion of this investigation it was found that the FSW process was capable of creating a sound defect free joint for a range of typical fit-up discontinuities in 0.125 in. thick 7075-T73 plate joined in a butt-weld by friction stir welding. The tolerance zone for weld path misalignment to the joint line was related to the formation of fine nugget grain structure at the bottom of the weld, with two thirds of the tolerance zone located on the advancing side of the pin. It was also determined that a certain amount of plate gap or voids in the weld path can be tolerated without a decrease in tensile strength; beyond an identifiable point, volumetric defects form in the nugget. Otherwise, there is little variation in tensile properties along the weld joint when care is taken to ensure gap and alignment tolerances are not exceeded. Thus, FSW has demonstrated that it can be a repeatable process with minimal variation, and that it is capable of absorbing small fit-up type variations without a noticeable effect on tensile strength.
Acknowledgments
The authors would like to thank the Federal Aviation Administration and the State of Kansas for providing funding for this research, and to Dr. Hossein Cheraghi of the Industrial Engineering Department at Wichita State University for his advice and assistance. The authors would also like to thank Adam Jahn, Josh Merry, and Siddharth Vyawahare from the Advanced Joining Lab at the National Institute for Aviation Research in Wichita, Kansas for their assistance.
References
1Nelson, T.W. “Friction Stir Welding – A Brief Review and Perspective for the Future,” TMS Friction Stir Welding and Processing III Conference, 2005.
2Christner, B. “Development and Testing of Friction Stir Welding (FSW) as a Joining Method for Primary Aircraft Structure,” 4th International Symposium on FSW, 2003.
3Record, J.H., Covington, J.L., Nelson, T.W., Sorensen, C.D., and Webb, B.W., “Fundamental Characterization of Friction Stir Welding,” Proceedings of the 5th International Friction Stir Welding Symposium, sponsored by TWI, Ltd., Metz, France 14-16 September, 2004.
4Lockwood, W.D., “Determination of Local Constitutive Properties of Heterogeneous Materials Using Digital Image Correlation and Finite Element Analysis,” Ph.D. Disseration, Department of Mechanical Engineering, University of South Carolina, 2000.
5Klæstrup Kristensen, J., Dalle-Donne, C., Ghidini, T., Mononen, J.T., Norman, A., Pietras, A., Russell, M., and Slater, S., “Properties of Friction Stir Welded Joints in Aluminum Alloys 2024, 5083, 6082/6060 and 7075,” Proceedings of the 5th International Friction Stir Welding Symposium, sponsored by TWI, Ltd., Metz, France 14-16 September, 2004.
6Hashimoto, T., Jyogan, S., Nakata, K., Kim, Y.G., and Ushio, M., “FSW Joints of High Strength Aluminum Alloy,” Proceedings of the 1st International Friction Stir Welding Symposium, sponsored by TWI, Ltd., Thousand Oaks, CA, 14-16 June, 1999.
7Liu, S., and Chao, Y.J., “Determination of Global Mechanical Response of Friction Stir Welded Plates Using Local Constitutive Properties,” Modeling and Simulation in Materials Science and Engineering, vol. 13, no. 1, January, 2005, pp. 1-15.
8Reynolds, A.P., Lockwood, W.D., and Seidel, T.U. “Processing Property Correlation in Friction Stir Welds,” Materials Science Forum, Vols. 331-337, pp. 1719-1724, 2000.
9Burford, D.A., “Friction Stir Welding of Airframe Structure: From One Delivery System to Another,” SAE International Technical Publication No. 2003-01-2897.
10 Magnusson, L., and Källman, L., “Mechanical Properties of Friction Stir Welds in Thin Sheet of Aluminum 2024, 6013 and 7475,” Proceedings of the 2nd International Symposium on FSW, sponsored by TWI, Ltd., Gothenburg, Sweden, 26-28 June, 2000.
11 Sylva, G., and Christner, B., “Friction Stir Weld Developments For Aerospace Applications,” International Conference on Advances in Welding Technology, Columbus, Ohio, 1996.
12 Arbegast, W.J., “Using Process Forces as a Statistical Process Control Tool for Friction Stir Welds,” Friction Stir Welding and Processing III, TMS Annual Meeting, San Francisco, CA, 13-17 February, 2005, pp. 193-204.
13 Leonard, A.J., and Lockyer, S.A., “Flaws in Friction Stir Welds,” Proceedings of the 4th International Friction Stir Welding Symposium, sponsored by TWI, Ltd., Park City, UT 14-16 May, 2003.
14 Dickerson, T.L., and Przydatek, J., “Fatigue of Friction Stir Welds in Aluminum Alloys that Contain Root Flaws,” International Journal of Fatigue, vol. 25, no. 12, December, 2003, pp. 1399-1409.
15 Russell, S.G., Tester, M., Nichols, E., Cleaver, A., and Maynor, J., “Static, Fatigue and Crack Growth Behavior of Friction Stir Welded 7075-T6 and 2024-T3 Aluminum Alloys,” Friction Stir Welding and Processing, Indianapolis, IN, 4-8 November, 2001, pp. 93-104.
16 Dalle Donne, C., Biallas, G., Ghindini, T., Raimbeaux, G., “Effect of Weld Imperfections and Residual Stresses on the Fatigue Crack Propagation in Friction Stir Welded Joints,” Proceedings of the 2nd International Symposium on FSW, sponsored by TWI, Ltd., Gothenburg, Sweden, 26-28 June, 2000.
17 Booth, D., and Sinclair, I., “Fatigue of Friction Stir Welded 2024-T351 Aluminum Alloy,” Materials Science Forum, vols. 396-402, 2002, pp. 1671-1676.
18 Lederich, R.J., Baumann, J.A., and Oelgoetz, P.A., “Friction Stir Welding of D357 Castings and 2024 Wrought Products,” Friction Stir Welding and Processing, Indianapolis, IN, 4-8 November, 2001, pp. 71-81.
19 Bussu, G., and Irving, P.E., “Fatigue Performance of Friction Stir Welded 2024-T351 Aluminum Joints,” Proceedings of the 1st International Friction Stir Welding Symposium, sponsored by TWI, Ltd., Thousand Oaks, CA, 14-16 June, 1999.
20 Liu, H.J., Fujii, H., Maeda, M., and Nogi, K., “Comparative Study on Fracture Locations of Friction Stir Welded Joints for Different Types of Aluminum Alloys,” Proceedings of the 4th International Friction Stir Welding Symposium, sponsored by TWI, Ltd., Park City, UT 14-16 May, 2003.
21 Palm, F., Steiger, H., and Henneböhle, U., “The Origin of Particle (Oxide) Traces in Friction Stir Welds,” Proceedings of the 4th International Friction Stir Welding Symposium, sponsored by TWI, Ltd., Park City, UT 14-16 May, 2003.
22 Vugrin, T., Schmücker, M., and Staniek, G., “Root Flaws of Friction Stir Welds – An Electron Microscopy Study,” Friction Stir Welding and Processing III, TMS Annual Meeting, San Francisco, CA, 13-17 February, 2005, pp. 277-284.
23 Larsson, H., Karlsson, L., Stoltz, S., and Bergqvist, E.L., “Joining of Dissimilar Al-alloys by Friction Stir Welding,” Proceedings of the 2nd International Friction Stir Welding Symposium, Gothenburg, Sweden, 26-28 June, 2000.
24 Bird, C., “Ultrasonic Phased Array Inspection Technology for the Evaluation of Friction Stir Welds,” Proceedings of the 4th International Friction Stir Welding Symposium, sponsored by TWI, Ltd., Park City, UT 14-16 May, 2003.
25 Lamarre, A., and Moles, M., “Ultrasound Phased Array Inspection Technology for the Evaluation of Friction Stir Welds,” Proceedings of the 2nd International Symposium on FSW, sponsored by TWI, Ltd., Gothenburg, Sweden, 26-28 June, 2000.
26 Nelson, T.W., Steel, R.J., and Arbegast, W.J. “Investigation of Heat Treatment on the Properties of Friction Stir Welds,” ASM Intl. Aeromat 2001 Conference Presentation, 2001.
27 Lumsden, J., Pollock, G., and Mahoney, M. “The Effect of Thermal Treatments on the Corrosion Behavior of Friction Stir Welded 7050 and 7075 Aluminum Alloys,” Materials Science Forum, vols. 426-432, pp. 2867-2872, 2003.
28 Kumar, B., Widener, C. , Jahn, A., Tweedy, B., Cope, D., and Lee, R. “Review of the Applicability of FSW Processing for Aircraft Applications,” 46th AIAA SDM Conference, Austin, TX, April, 2005.
29 Kumar, B., Widener, C., Cope, D., and Tweedy, B., “Effects Post Weld Aging on the Fatigue Crack Growth Rate, Corrosion Characteristics and Weld Microstructure of Al 2024 and 7075 Alloys,” ASM Intl. Aeromat 2005 Conference Presentation, Orlando, FL, 6-9 June, 2005.
